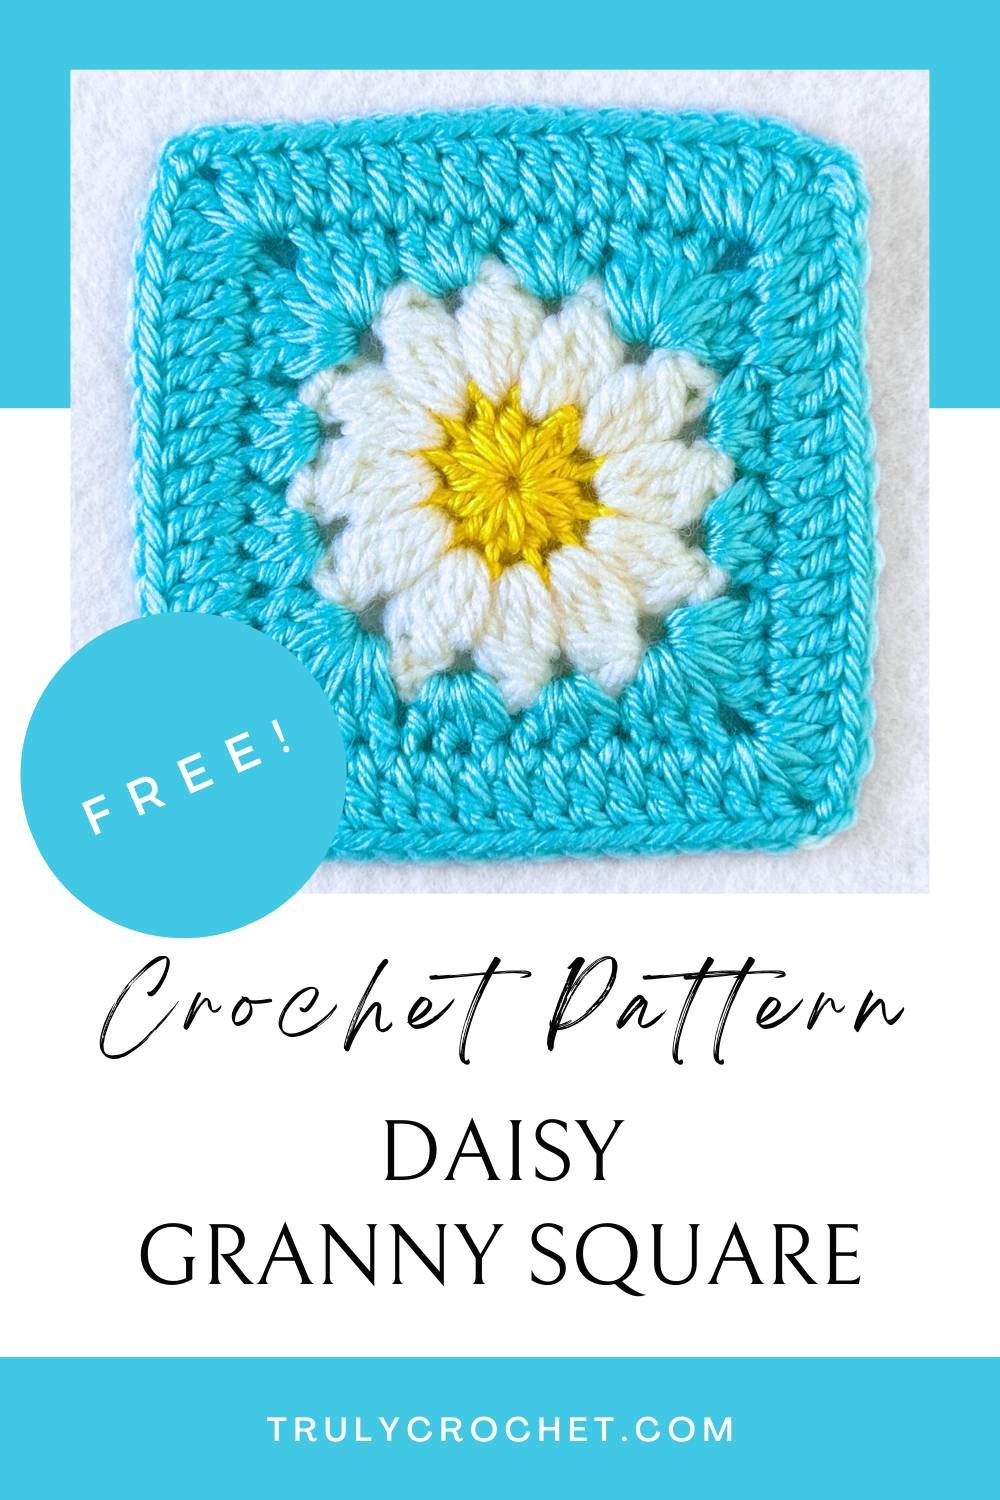
The Daisy Granny Square – Free Crochet Pattern is a charming, beginner-friendly pattern that brings a touch of floral beauty to your crochet projects.
Daisy Granny Square: Free Crochet Pattern
The Daisy Granny Square – Free Crochet Pattern is a charming, beginner-friendly pattern that brings a touch of floral beauty to your crochet projects. With its cheerful daisy motif at the center, this square uses a delightful combination of simple stitches like the chain stitch, half-double crochet (hdc), double crochet (dc), and the cluster stitch. Perfect for those just starting out or looking to expand their skills, this square is not only easy to crochet but also a fantastic way to bring bright, joyful designs into your creations.
Why the Daisy Granny Square is Special
What makes the Daisy Granny Square so special is its floral theme. The design mimics a daisy’s shape, with petals radiating from the center of the square, surrounded by a neat and simple border. This eye-catching square is an ideal addition to blankets, pillows, or even clothing, giving your projects a playful and nature-inspired touch.
Key Features:
- Floral Centerpiece: The daisy motif is the star of the show, offering a burst of creativity and color.
- Textured Design: Thanks to the cluster stitches used to form the petals, this granny square has a lovely, raised texture.
- Beginner-Friendly: Even though it looks intricate, this pattern is simple enough for beginners to enjoy, with just a few basic stitches to master.
Perfect for Beginners
The Daisy Granny Square is an excellent project for beginners who want to try something a little more decorative without getting overwhelmed. It offers the opportunity to work with several different stitches while maintaining a pattern that’s still very approachable. Plus, the mix of texture and design gives crocheters a rewarding project that’s not too complicated.
Stitches You’ll Use:
- Chain Stitch (ch): The foundation of many crochet patterns, chains help create spaces and structure within the square.
- Half-Double Crochet (hdc): A versatile stitch that offers a slightly shorter height than the double crochet but is still quick to work up.
- Double Crochet (dc): A popular and essential stitch that forms much of the daisy and surrounding square.
- Cluster Stitch: A fun stitch that groups multiple stitches together, creating the petal-like shapes that give the square its floral appearance.
With these stitches, you can crochet a daisy that’s both fun and simple, making it a wonderful learning experience for beginners!
A Splash of Creativity
One of the most exciting things about the Daisy Granny Square is how customizable it is. With endless color possibilities and the flexibility to incorporate it into different projects, this square encourages creativity. Here are a few ideas on how you can make your daisy square truly your own:
Play with Colors
You can make the Daisy Granny Square as bright or as subtle as you like! Try using sunny yellows and soft whites to mimic a real daisy, or go for bold, vibrant colors like pinks, purples, or blues for a fun twist. The surrounding square can be done in neutral tones to let the daisy shine, or you can mix and match vibrant colors for a patchwork effect.
Use in Larger Projects
The Daisy Granny Square isn’t just for individual squares—it’s perfect for creating larger projects with a floral theme. Whether you’re planning a blanket, throw pillow, or even a boho-style bag, this daisy square adds a touch of whimsy and personality. You can stitch multiple squares together to form a beautiful daisy garden that brightens up any room!
Add Extra Texture
Want to enhance the texture even more? Use a textured yarn or experiment with different types of yarn weights to make the petals of the daisy really pop. This simple change can give your granny square an even more three-dimensional look and feel, making your project truly unique.
Why You’ll Love Making the Daisy Granny Square
Crocheting the Daisy Granny Square is not only fun but also incredibly rewarding. Whether you’re making it for a larger project or just enjoying the process of creating a beautiful floral motif, this pattern offers plenty of reasons to love it:
- Quick to Make: This square works up quickly, making it the perfect project for when you want to see fast progress.
- Playful and Versatile: The floral design adds a playful touch to any project, from blankets and scarves to accessories and home decor.
- Great for Gifts: A daisy-themed blanket or pillow made from these squares would make an excellent handmade gift for a loved one.
A Crochet Classic with a Twist
The Daisy Granny Square takes the classic granny square pattern to the next level by incorporating a flower motif in the center. This modern twist on a timeless pattern makes it a fantastic addition to your crochet projects. The combination of simple stitches and textured clusters makes this square both easy and fun to create. Whether you’re a beginner looking to expand your skills or an experienced crocheter seeking a cute, floral design, this pattern is sure to bring joy to your crochet experience.
So grab your yarn, hook, and favorite colors, and let the Daisy Granny Square brighten up your next crochet project. With its easy-to-follow pattern and cheerful design, you’ll be making these squares for all kinds of creative projects in no time!
Daisy Granny Square – Free Crochet Pattern
Join Our All Access Pass
Joining the Granny Square All Access Pass from Truly Crochet gives you unlimited access to a world of crochet creativity! Here’s what you can enjoy with this exclusive membership:
- Unlimited access to granny square patterns: Explore a vast library of unique designs to suit any project.
- Easy-to-download PDF files: Save patterns directly to your device for easy reference on-the-go.
- Exclusive tutorials: Get visual guidance to create beautiful granny squares.
- Seasonal and holiday patterns: Stay inspired all year round with fresh, themed designs.
- Early access to new patterns: Be the first to try out exciting new patterns before anyone else.
7 DAY FREE TRIAL – Join today and let your granny square journey blossom with Truly Crochet!
Supplies You Will Need:
Stitches Used:
Ch – Chain
Hdc – Half Double Crochet
Dc – Double Crochet
Sts – Stitches
Cluster Stitch:
- Yarn over, insert hook into the indicated space, and pull up a loop. Yarn over and pull through 2 loops (2 loops on your hook)
- Yarn over, insert hook into the same space, and pull up a loop. Yarn over and pull through 2 loops (3 loops on your hook)
- Yarn over, insert hook into the same space, and pull up a loop. Yarn over and pull through 2 loops (4 loops on your hook)
- Yarn over, and pull yarn through all loops on the hook.
- Ch2 to secure.
Written In:
This pattern is written using American standard crochet terminology.
Notes:
- This crochet pattern is worked in the round.
- Repeat what is in between the stars from * to * until the end of the round.
- If you have a ** in your row you need to follow the pattern from * to * all the way around and then when you get near the end of the round you will finish your last repeat at ** because you can no longer complete the entire repeat, then follow what it says to do to complete the round.
- Read each row carefully before starting the round.
Let’s get to the pattern!
R1. Yellow yarn – Make a magic ring or ch4, join with a slip stitch to beginning ch to form a ring, ch1 (does not count as a stitch) Work 12hdc in ring, join with a slip stitch to beginning hdc, fasten off (12hdc)
R2. White yarn – Join yarn in any hdc stitch, ch1 (does not count as a stitch), Work a cluster stitch in each hdc stitch around, join with a slip stitch to beginning cluster, slip stitch into next ch2 space, fasten off (12 cluster stitches + 12 ch2 spaces)
R3. Blue yarn – Join yarn in any ch2 space.
- First Corner: Ch2 (counts as 1dc) Work (2dc, ch2, 3dc) in the same ch2 space.
- Crochet the first side: 3hdc in the next ch2 space, 3hdc in the next ch2 space.
- Second Corner: Work (3dc, ch2, 3dc) in the next ch2 space.
- Crochet the second side: 3hdc in the next ch2 space, 3hdc in the next ch2 space.
- Third corner: Work (3dc, ch2, 3dc) in the next ch2 space.
- Crochet the third side: 3hdc in the next ch2 space, 3hdc in the next ch2 space.
- Final corner: Work (3dc, ch2, 3dc) in the next ch2 space.
- Crochet the last side: 3hdc in the next ch2 space, 3hdc in the next ch2 space. join with a slip stitch to the top of the beginning ch2, slip stitch in to next ch2 space.
R4. Ch2 (counts as 1dc) Work (2dc, ch2, 3dc) in the same ch2 space, 1dc in next 12sts * Work (3dc, ch2, 3dc) in next ch2 space, 1dc in next 12sts * Repeat from * to * all the way around, join with a slip stitch to beginning ch2, slip stitch in to next ch2 space (x4 lots of (3dc, ch2, 3dc) + x4 lots of 12dc)
Fasten off and weave in all ends. Move on to joining and blocking.
I hope you love your new granny square, have fun crocheting!
Clare x
Joining Granny Squares
Joining granny squares is like piecing together a colorful puzzle, turning individual squares into a cohesive masterpiece. Whether you’re creating a blanket, scarf, or cushion, the process of joining adds a final touch of creativity and satisfaction. With various methods like whip stitch, slip stitch, or join-as-you-go, you can customize the look and feel of your project.
Whip Stitch
To join your granny squares using the whip stitch method, you will need a yarn needle and yarn in the same color as your square.
- Hold two squares together with the right sides facing out and align the stitches.
- Working from right to left, sew whip stitches through each set of loops from both granny squares.
- You can either sew through one loop on each square, or through both loops on each square.
- Repeat across the granny square to join them together.
Joining Granny Squares with the Slip Stitch Method
To join your granny squares using the slip stitch method, you will need a crochet hook and some yarn.
- Start by holding two squares together with the wrong sides facing out and align the stitches.
- Insert your hook through the outer loops of the granny square, the front loops on the square facing you, and the back loop of the square facing away from you.
- Yarn over and pull through both loops on your hook.
- Insert your hook into the next set of loops on your granny square.
- Yarn over and pull through to form the next slip stitch.
- Repeat across the granny square to join them together.
Blocking
Blocking granny squares is a fun and satisfying way to bring out the beauty in your crochet! Here are some easy and effective methods to try:
- Wet Blocking: Soak your square in water, gently shape it, and pin it down on a blocking mat until dry. It’s like giving your square a spa day!
- Steam Blocking: Use a steamer or iron to lightly steam the square while it’s pinned, watching the stitches pop into place.
- Spray Blocking: Mist your square with water, pin it to shape, and let it air dry for a fresh, crisp finish.
Each method helps ensure your squares are even, making your final project look amazing!
More Crochet Granny Square Patterns
If you liked this granny square, you might be interested in these related granny square patterns:
WHERE TO NEXT?
Pin this post: Save this to your Pinterest boards so that you can come back to it later.
Leave a comment: Leave a comment below, we love to hear your feedback!
Share on Instagram: When you make this project, share it on social media and tag me @trulycrochet. We love to see what you are currently making!
TERMS OF USE:
These Terms of Use apply to all the patterns and tutorials made by Truly Crochet. All of the patterns and tutorials are for personal use only and belong to Truly Crochet.
- You are not allowed to copy, reproduce, adjust, distribute or sell Truly Crochet patterns and tutorials in whole or in part.
- You are not allowed to distribute and/or sell the translations of Truly Crochet patterns and tutorials in whole or in part.
- You can sell finished items made using Truly Crochet patterns, however, you have to give credit to Truly Crochet for the actual design.
- You are not allowed to use Truly Crochet photos without written permission.
- You are not allowed to copy and paste Truly Crochet patterns or tutorials to social media or anywhere else in whole or in part.
- If you would like to share the patterns, you can give a link to the Truly Crochet website www.trulycrochet.com.

