Learn how to crochet the Sunburst Granny Square with this step-by-step tutorial for beginners. Includes materials list, stitch guide, troubleshooting tips, and project ideas.
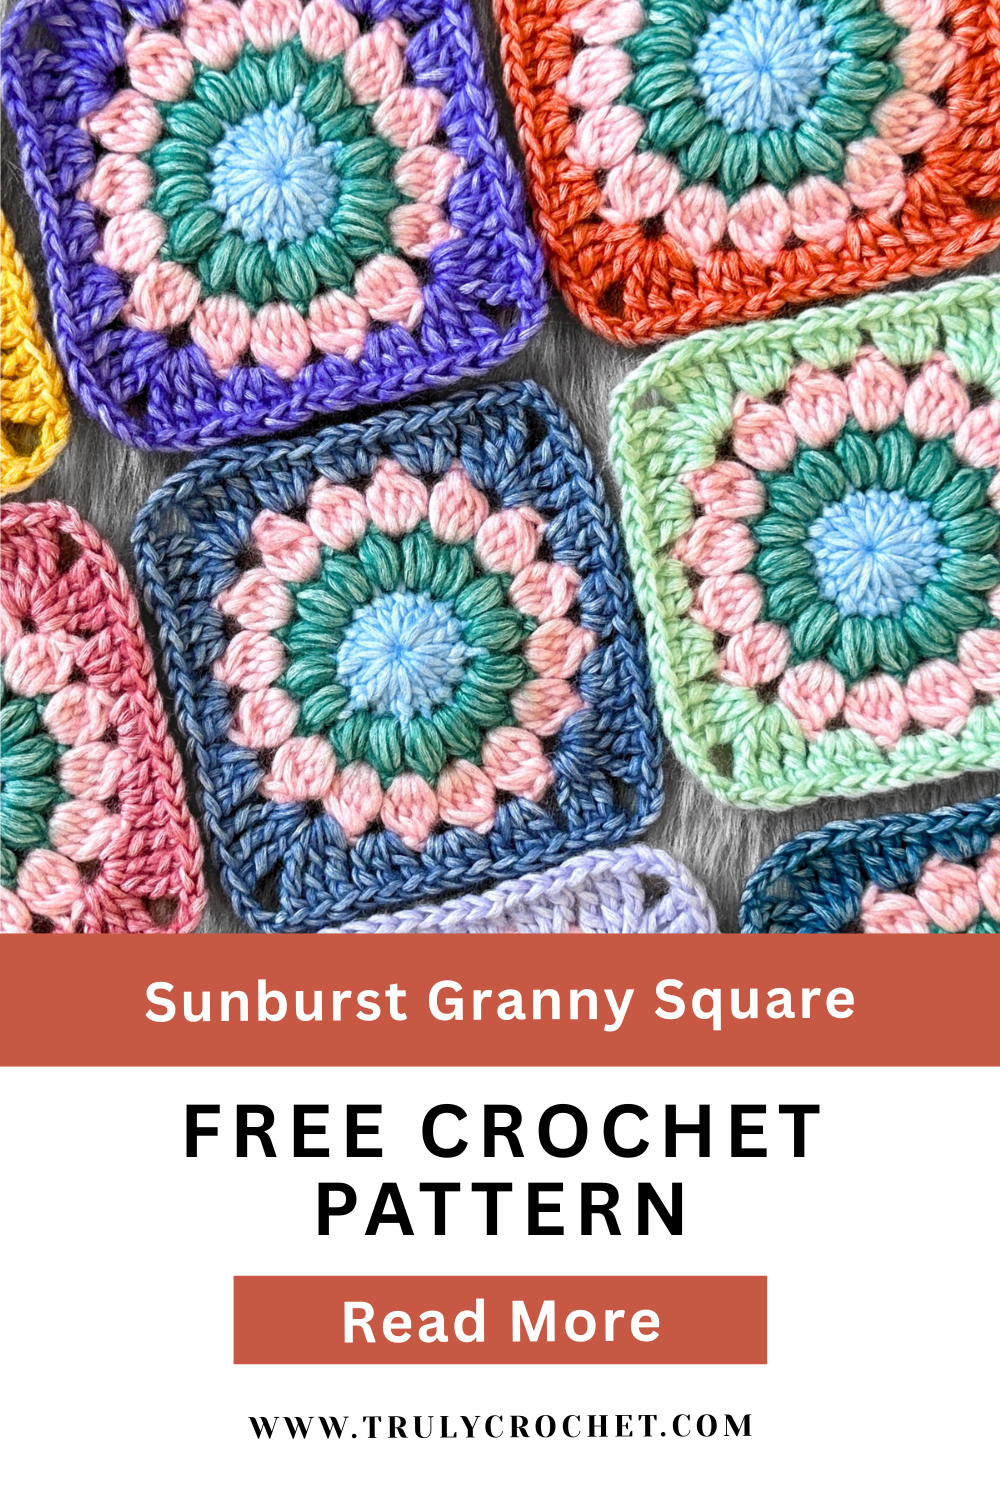
If you’ve been scrolling Pinterest or Instagram, you might have seen a colorful square that looks like a tiny burst of sunshine. That’s the Sunburst Granny Square and it felt totally out of reach to me at first. I was a complete beginner: I didn’t know what “dc” meant or how to start a circle. But once I broke it into small steps, it clicked. This guide walks you through everything, supplies, the stitches you’ll need, a clear step-by-step pattern, troubleshooting, and ideas for what to make with your squares.
What Is A Sunburst Granny Square?
Think of the classic granny square but with a decorative, textured center that looks like a sun or flower. You work rounds outward from the center by a round of double crochets then you will create a textured round of puff stitches which actually look like petals. For your third round you will work clusters and then you will turn the circle into a square by adding tr, dc and hdc stitches. The Sunburst Granny Square is gorgeous, easy to customize with color, and perfect for blankets, bags, garments, and more.
What You Will Need
-
Yarn: You can use any yarn, for mine i used Yarnsmiths Pebble Haze DK which is a cotton blend that gives crisp stitches.
-
Hook: Any hook that corresponds to your yarn, i used a 4mm crochet hook.
-
Yarn Needle: For weaving in your ends.
-
Stitch Markers: These are optional to mark the rounds or corners.
Stitches You Should Know:
If you’re brand-new to crocheting, learn these crochet stitches first as these are what you need to be able to crochet the Sunburst Granny Square
-
Ch (Chain)
-
Sl St (Slip Stitch)
-
Hdc (Half Double Crochet)
-
Dc (Double Crochet)
-
Tr (Treble)
-
Puff Stitch (Puff Stitch)
- Cluster St (Cluster Stitch)
Stitch Breakdown:
Ch – Chain
- Make a slip knot, insert your hook into the slip knot loop.
- Yarn over and pull up a new loop.
- The first chain stitch is now complete.
- Keep repeating the above steps to make the next chain stitch and the rest of the foundation chain.
Hdc – Half Double Crochet
- Yarn over, insert hook into the next stitch.
- Yarn over, pull up a loop.
- Yarn over again, pull the yarn through all three loops on the hook.
Dc – Double Crochet
- Yarn over, insert hook into the next stitch, yarn over, and pull up a loop.
- Yarn over, and pull through two loops on the hook.
- Yarn over again, and pull through both loops on the hook.
Tr – Treble Crochet
- Yarn over twice. Insert hook into the next stitch, yarn over, and pull up a loop.
- Yarn over, pull through two loops on hook.
- Yarn over, pull through two loops on hook.
- Yarn over, pull through both loops on hook.
Puff St – Puff Stitch
- Yarn over, insert your hook into the indicated stitch. Yarn over and pull up a loop. (You will have 3 loops on your hook.)
- Yarn over, insert your hook into the same stitch, and pull up a loop. (5 loops on your hook.)
- Yarn over, insert your hook into the same stitch, and pull up a loop. (7 loops on your hook.)
- Yarn over, insert your hook into the same stitch, and pull up a loop. (9 loops on your hook.)
- Yarn over and pull through all 9 loops on your hook.
- Ch1 to secure.
Cluster St – Cluster Stitch
- Yarn over, insert hook into the indicated space, pull up a loop. Yarn over, pull through 2 loops on hook (2 loops on hook)
- Yarn over, insert hook into the same space, pull up a loop. Yarn over, pull through 2 loops on hook (3 loops on hook)
- Yarn over, insert hook into the same space, pull up a loop. Yarn over, pull through 2 loops on hook (4 loops on hook)
- Yarn over, insert hook into the same space, pull up a loop. Yarn over, pull through 2 loops on hook (5 loops on hook)
- Yarn over, pull yarn through all loops on the hook.
- Ch2 to secure.
Quick Summary:
-
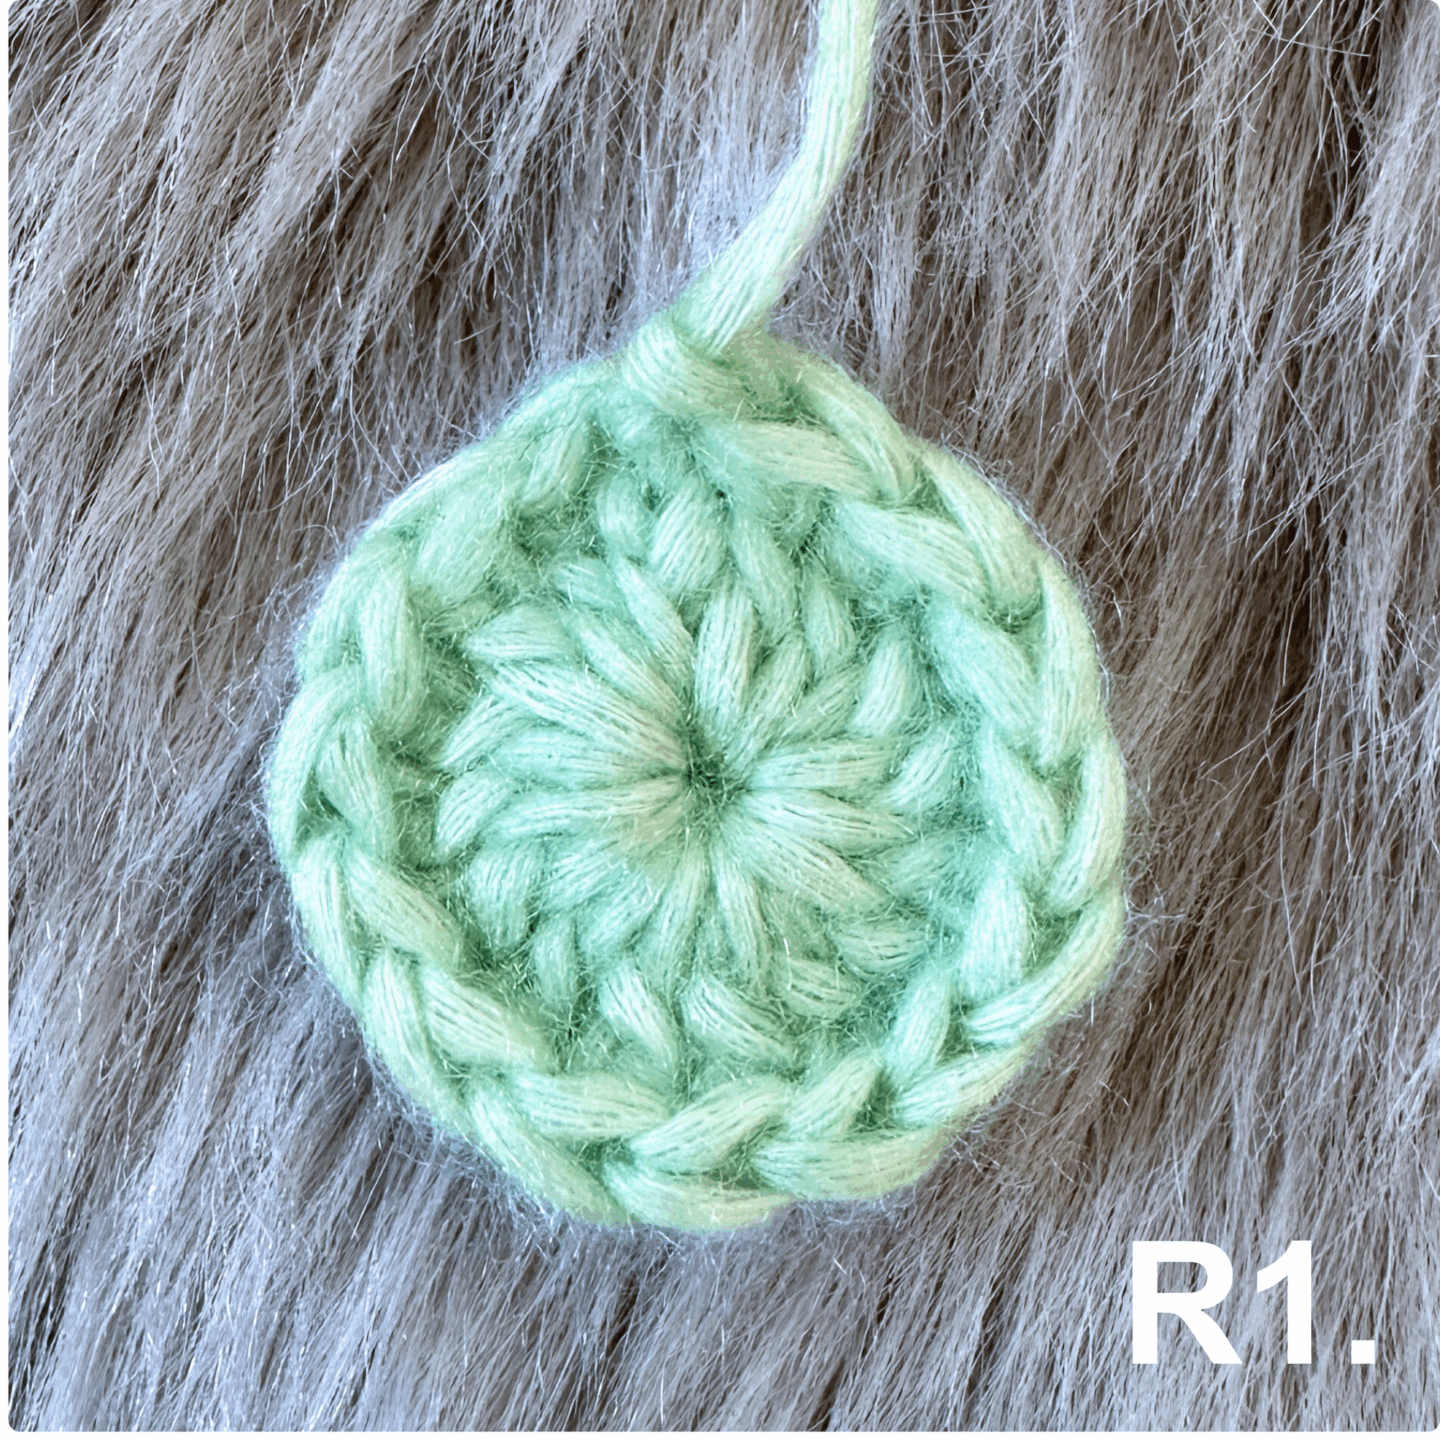
R1: Magic ring, 16 dc, join.
-
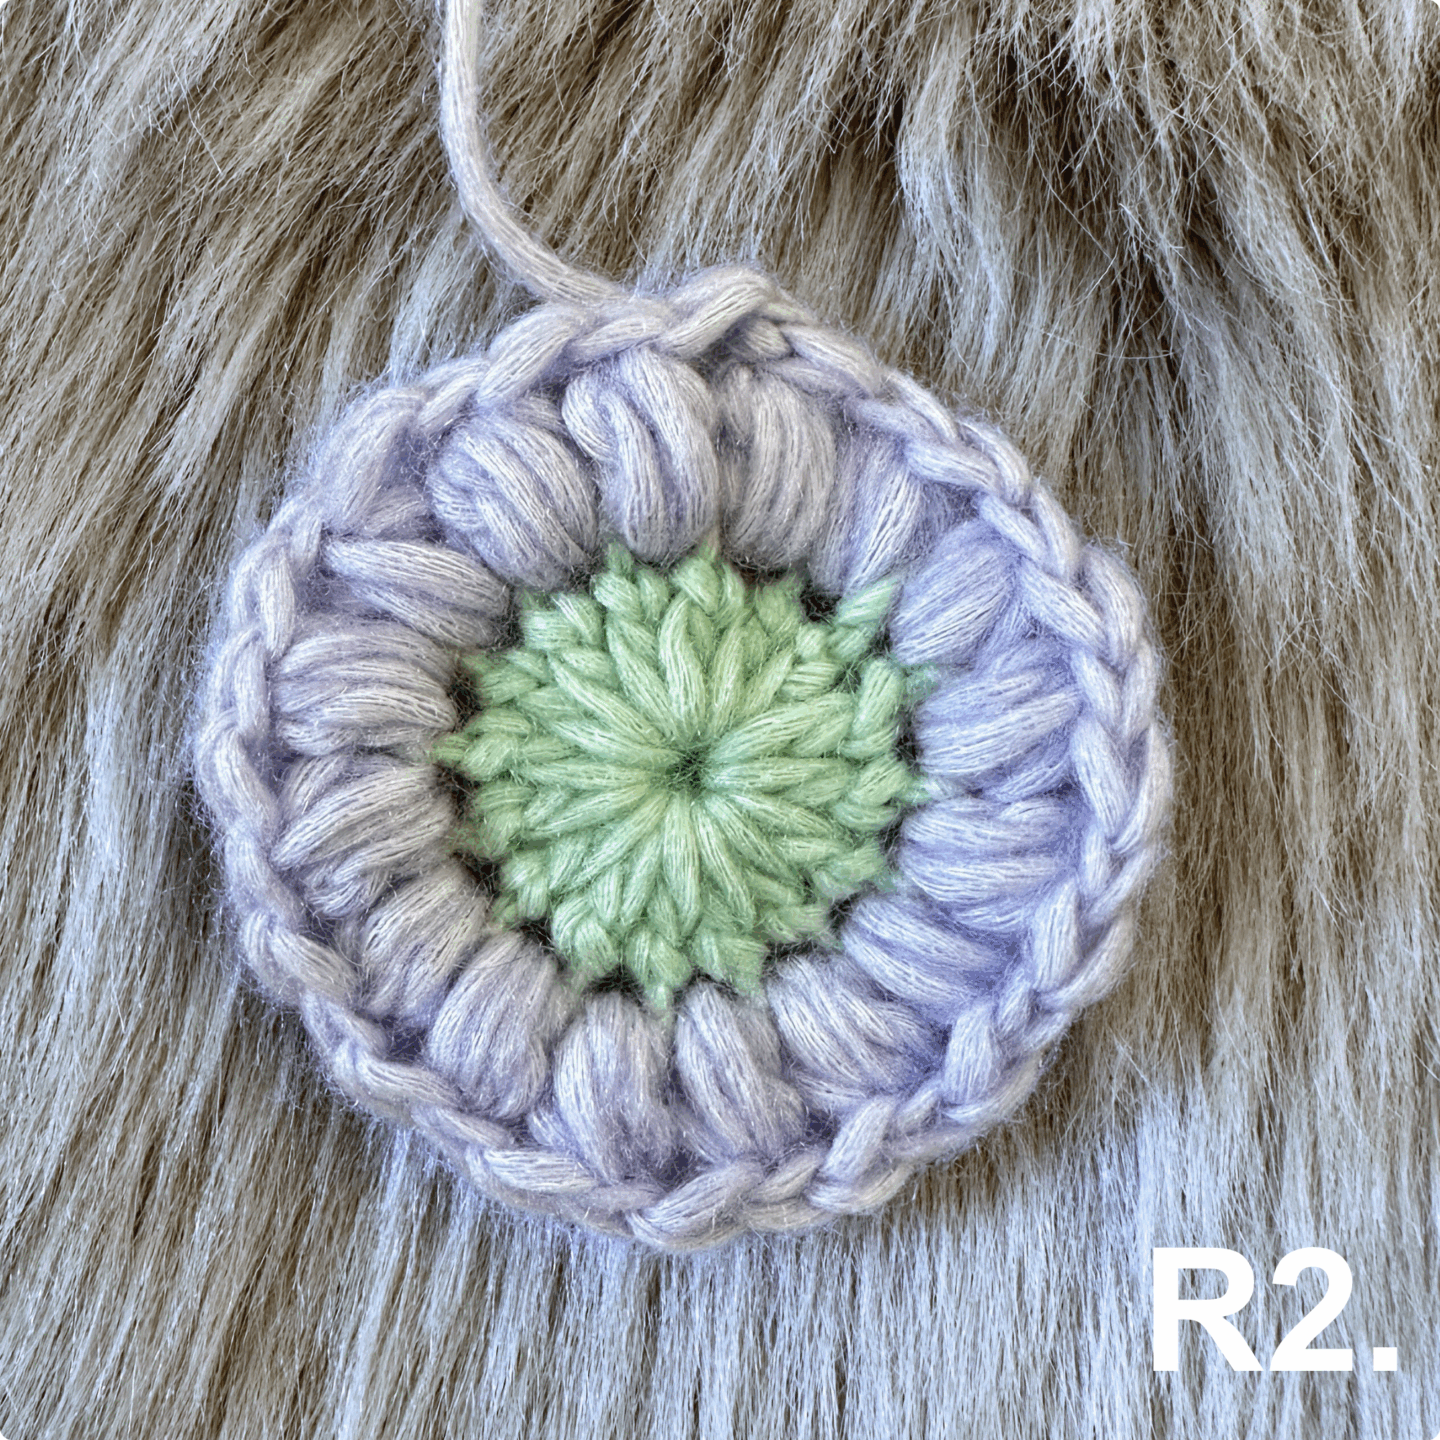
R2: Join color, 16 puff stitches, join.
-
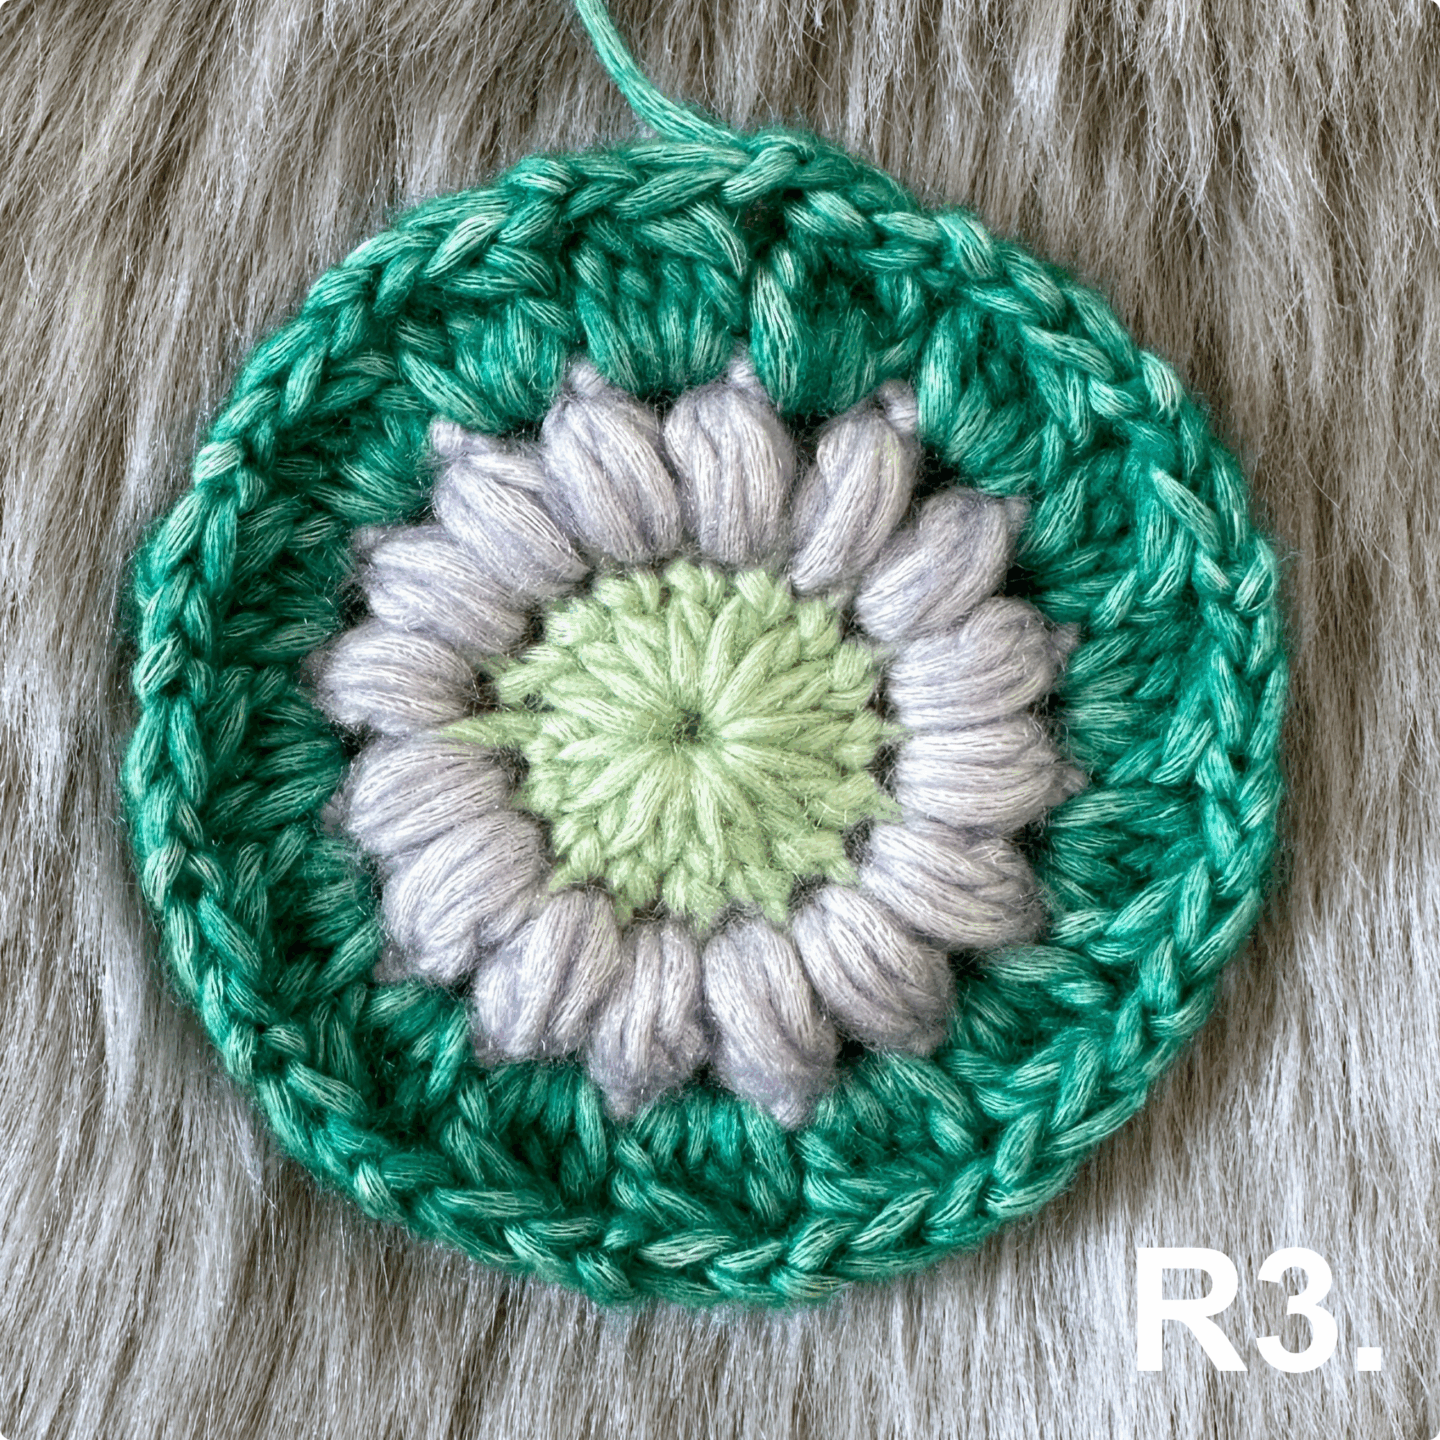
R3: Join color, 16 cluster stitches, join.
-
R4: Join color, (3 tr, ch3, 3 tr) four times to make corners with dc’s and hdc’s, Join, fasten off, weave in ends, block.
Full Written Pattern:
R1. Make a magic ring, (Alternatively, you can ch4, join with a slip stitch to make a ring) Ch3 (counts as 1dc) Work 15dc into the ring. Join with a slip stitch to beginning ch3, fasten off (16dc)
R2. Join new yarn in any dc, Ch2, Work a puff stitch in the same stitch and in each dc around, join with a slip stitch to the first puff stitch, slip stitch in to next ch1 space, fasten off (16 puff sts + ch1 spaces)
R3. Join new yarn in any ch1 space, Ch1, Work a cluster stitch in the same stitch and in each ch1 space around, join with a slip stitch to beginning cluster stitch, slip stitch in to next ch2 space, fasten off (16 cluster sts + 16 ch2 spaces)
R4. Join new yarn in any ch2 space.
- First Corner: Ch3 (counts as 1tr) Work (2tr, ch2, 3tr) in the same ch2 space.
- Crochet the first side: 3dc in the next ch2 space, 3hdc in the next ch2 space, 3dc in the next ch2 space.
- Second Corner: Work (3tr, ch2, 3tr) in the next ch2 space.
- Crochet the second side: 3dc in the next ch2 space, 3hdc in the next ch2 space, 3dc in the next ch2 space.
- Third corner: Work (3tr, ch2, 3tr) in the next ch2 space.
- Crochet the third side: 3dc in the next ch2 space, 3hdc in the next ch2 space, 3dc in the next ch2 space.
- Final corner: Work (3tr, ch2, 3tr) in the next ch2 space.
- Crochet the last side: 3dc in the next ch2 space, 3hdc in the next ch2 space, 3dc in the next ch2 space, join with a slip stitch to the top of the beginning ch3, slip stitch in to next ch2 space.

Fasten off and weave in all ends.
Troubleshooting – What To Do If Things Go Wrong:
1. My square is curling (like a bowl).
-
Cause: Tension too tight or missing stitches.
-
Fix: Relax your grip; count stitches at the end of each round.
2. The square is wavy and won’t lie flat.
-
Cause: Too many stitches in a round.
-
Fix: Confirm you didn’t accidentally add extra chains or clusters. Check the stitch counts.
3. There’s a hole in the center.
-
Cause: Magic ring not pulled tight, or starting chain too long.
-
Fix: Pull the tail of the magic ring firmly to close. If using chains, reduce starting chains (e.g., ch3 instead of ch4).
4. Puff stitches look uneven.
-
Cause: Loops pulled to different heights.
-
Fix: Pull each loop up to the same height before finishing the puff. Practice on scrap yarn first.
5. Corners aren’t sharp.
-
Cause: Not enough chains in corners or tightness in corner chains.
-
Fix: Use ch3 or ch4 for corners depending on your tension. Don’t pull corner chains tight.
6. My squares change size after joining.
-
Cause: Joining method too tight.
-
Fix: Join more loosely (especially if using slip-stitch joins) or try a join-as-you-go method that preserves tension.
If you get stuck, rip back to the last round that looked right (don’t be afraid to frog – it’s part of learning).
Project Ideas – What To Make With Your Sunburst Squares:
Once you can make one square, you’ll want a hundred. Here are some beginner-friendly projects ideas and quick notes on joining:
Baby blanket
-
Make 64 small squares (8×8) or 36 medium squares (6×6) and join. Use bright colors for a cheerful baby gift.
Cushion cover
-
Make two panels the size of your pillow and seam them together. Finish with a zipper or buttoned flap.
Tote bag
-
Make two rectangular panels, line with fabric for structure, add handles. Great scrap-yarn project.
Scarf or wrap
-
Join squares in a long strip. For a subtle scarf, use a neutral palette; for boho vibes, go wild with colors.
Cardigan or vest
-
Use granny construction patterns. Place squares into sleeves and body panels. Start with a small, open-front vest to practice.
Table runner or placemats
-
Arrange squares in a row or grid for dining décor.
Wall hanging
-
Arrange squares into an art piece and hang from a wooden dowel for instant decor.
Blocking The Sunburst Granny Square:
Blocking is the process of shaping your finished crochet square so it lays flat, holds its shape, and has even edges. Because the Sunburst Granny Square uses a few different stitches, blocking helps smooth out any curling edges and ensures all your squares are the same size before joining.
Blocking Tools You’ll Need
-
Blocking mats: Foam mats, kids’ play mats, or a dedicated blocking board.
-
T-pins or blocking pins: Rust-proof pins to hold your square in place.
-
Spray bottle or steam iron: For adding moisture or steam.
-
Measuring tape: To ensure all squares are blocked to the same size.
Blocking Tips for Sunburst Granny Squares
-
Block before joining: This ensures all squares are the same size and lay flat for joining.
-
Measure carefully: If one square is smaller, you can stretch it slightly when blocking to match others.
-
Don’t over-stretch puff stitches: You want them to keep their texture while the edges stay straight.
-
Block again after joining: For blankets or large projects, block the whole piece after joining for the best finish.
Why Blocking Matters for Sunburst Granny Squares
-
Improves Shape: Keeps your squares perfectly square instead of slightly rounded or uneven.
-
Matches Sizes: Ensures all squares match up when joining, especially important for blankets.
-
Opens the Stitch Pattern: Puff stitches and clusters relax into place, showing off the design.
-
Gives a Professional Finish: Projects look neater and more polished.
Method 1: Wet Blocking
Best for: All yarn types.
How to do it:
-
Fill a basin or sink with lukewarm water.
-
Submerge your square completely and let it soak for 10–15 minutes.
-
Gently squeeze (don’t wring) out excess water and roll in a towel to remove more moisture.
-
Lay your square on a blocking board or foam mat.
-
Pin each corner and side straight, making sure edges are even.
-
Leave to dry completely before removing pins.
Tip: For puff stitches, gently lift and shape each puff so they sit nicely after drying.
Method 2: Steam Blocking
Best for: Acrylic yarns or acrylic blends (but works for other fibers if done carefully).
How to do it:
-
Lay your square on a blocking mat and pin it to shape.
-
Fill your iron with water and set it to the steam setting – do not touch the iron to the crochet.
-
Hover the iron about 1–2 inches above the square, letting the steam relax the fibers.
-
Lightly pat into shape with your hands if needed.
-
Allow to cool and dry before removing pins.
Tip: Steam can permanently set acrylic yarn, so be sure you’re happy with the shape before steaming.
Method 3: Spray Blocking
Best for: Quick, gentle blocking of any fiber.
How to do it:
-
Pin your dry square to a blocking mat in the correct shape.
-
Lightly mist it with water using a spray bottle until damp.
-
Leave to air dry completely before removing pins.
Tip: This is a good option if your squares just need a little reshaping rather than a full re-block.
How to Join Sunburst Granny Squares
Once you’ve made a stack of beautiful Sunburst Granny Squares, the next step is joining them together. The method you choose can completely change the look and feel of your finished project. Below are the most popular joining techniques:
1. Whip Stitch Join (Sewing Method)
Best for: A flat, nearly invisible join on blankets, garments, or items where you don’t want extra bulk.
How to do it:
-
Place two squares right sides facing each other.
-
Thread a yarn needle with matching yarn.
-
Whip stitch through the back loops of both squares along the edge.
-
Keep stitches even but not tight, so the seam stays flat.
Tip: Because this can be quite a tight join, just make sure you pull it securely just not too much so the squares don’t pucker.
2. Slip Stitch Join
Best for: Decorative seams with a slightly raised ridge. Works well for cushions, bags, and boho-style projects.
How to do it:
-
Hold two squares right sides together or wrong sides together depending on desired look.
-
Insert hook through both loops of the corner stitches on each square.
-
Yarn over, pull through both squares, then pull through the loop on your hook (slip stitch).
-
Continue along the edge, slip stitching in each pair of stitches.
Tip: If you want a neat ridge on the front of your project, hold the squares with wrong sides together.
3. Join-As-You-Go (JAYG)
Best for: Large projects like blankets where you want to avoid long seaming sessions. Also great for keeping joins consistent as you work.
How to do it:
-
Complete your first square fully.
-
For the second square, work its final round until you reach the side where it will join another square.
-
Instead of chaining for the space between clusters, slip stitch into the corresponding space of the completed square.
-
Continue alternating between your current square and the joined square until all edges are connected.
Tip: For Sunburst squares, JAYG works best if you make the final round slightly looser, so the stitches aren’t pulled tight during joining.
4. Flat Slip Stitch Join (Back Loop Only)
Best for: A flat but decorative seam that sits lower than a standard slip stitch join.
How to do it:
-
Hold squares right sides up side by side.
-
Insert hook through the back loop only of the stitch on the first square and the back loop only of the corresponding stitch on the second square.
-
Slip stitch across the edge, joining them together.
Tip: This method frames each square with a subtle ridge, great for defining your motifs.
5. Single Crochet Join
Best for: Sturdy seams with a textured, raised look which is perfect for borders on blankets or bags.
How to do it:
-
Hold squares with wrong sides together.
-
Insert hook through both loops of corner stitches, yarn over, pull through both squares, yarn over, pull through two loops (single crochet).
-
Continue along the edge, keeping tension even.
Tip: For Sunburst Granny Squares, single crochet joins look especially nice if worked in a contrasting color.
Final Thoughts
The Sunburst Granny Square looks impressive but is made of simple steps repeated with care. Take your time learning each stitch, practice the puff on scrap yarn, and don’t be afraid to frog and try again. Once you have a handful of squares, joining them and turning them into a finished project is the most rewarding part.

