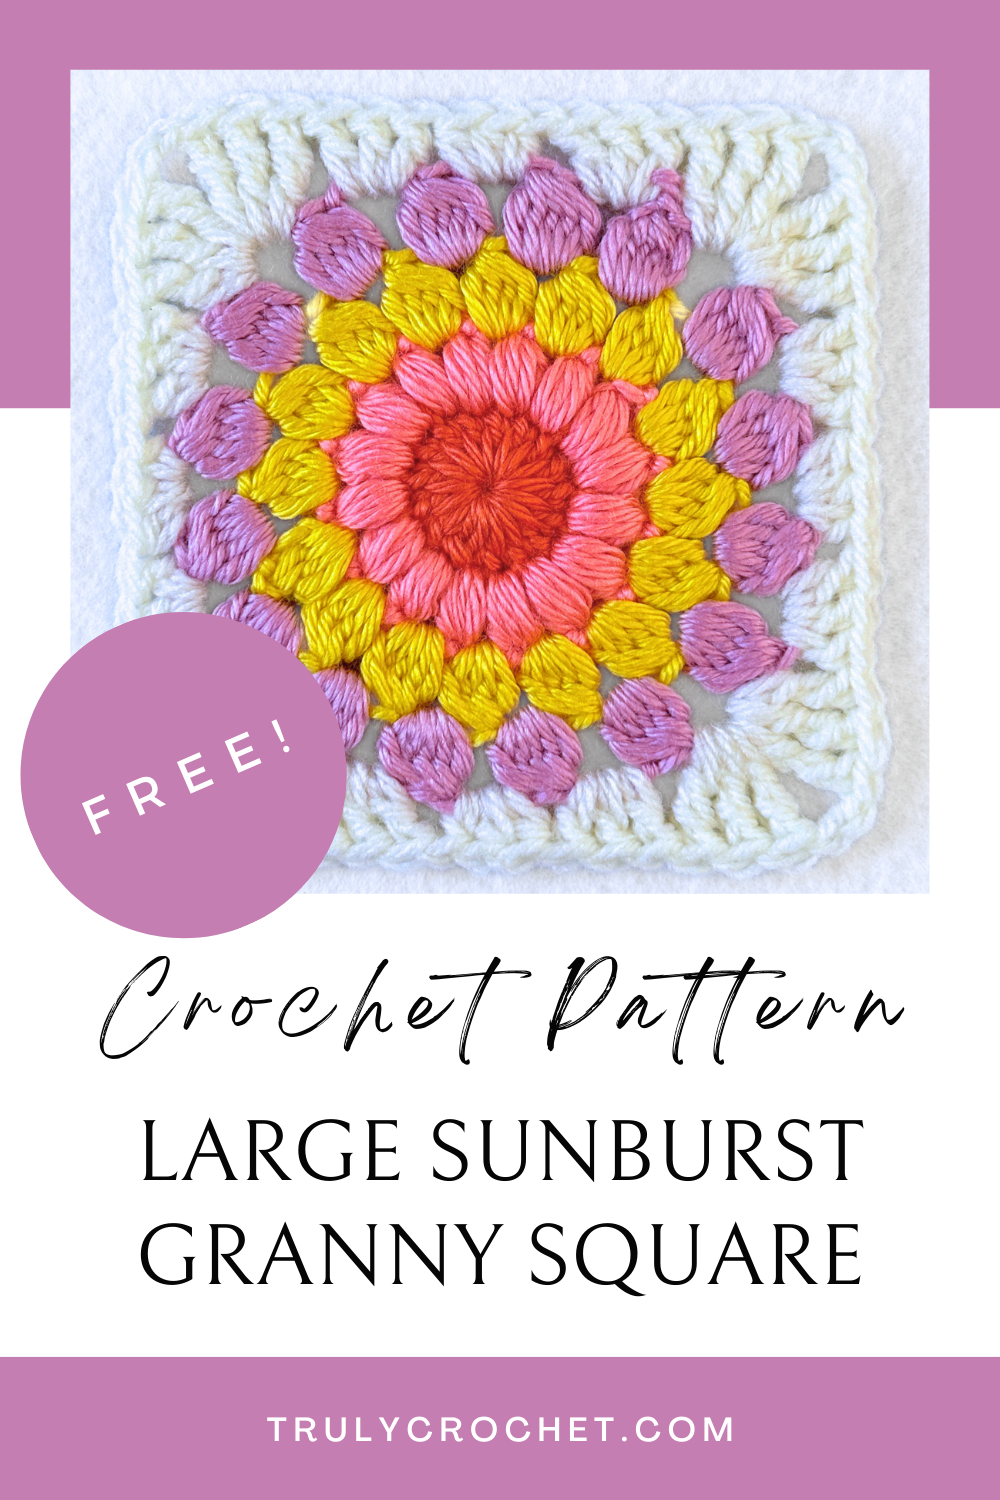
The Large Sunburst Granny Square – Free Crochet Pattern is a radiant, beginner-friendly crochet pattern that bursts with texture and color.
Large Sunburst Granny Square – Free Crochet Pattern
Join Our All Access Pass
Joining the Granny Square All Access Pass from Truly Crochet gives you unlimited access to a world of crochet creativity! Here’s what you can enjoy with this exclusive membership:
- Unlimited access to granny square patterns: Explore a vast library of unique designs to suit any project.
- Easy-to-download PDF files: Save patterns directly to your device for easy reference on-the-go.
- Exclusive tutorials: Get visual guidance to create beautiful granny squares.
- Seasonal and holiday patterns: Stay inspired all year round with fresh, themed designs.
- Early access to new patterns: Be the first to try out exciting new patterns before anyone else.
7 DAY FREE TRIAL – Join today and let your granny square journey blossom with Truly Crochet!
Supplies You Will Need:
Stitches Used:
Ch – Chain
Hdc – Half Double Crochet
Dc – Double Crochet
Tr – Treble Crochet
Sts – Stitches
Puff St – Puff Stitch:
- Yarn over, insert your hook into the indicated stitch. Yarn over and pull up a loop. (You will have 3 loops on your hook.)
- Yarn over, insert your hook into the same stitch, and pull up a loop. (5 loops on your hook.)
- Yarn over, insert your hook into the same stitch, and pull up a loop. (7 loops on your hook.)
- Yarn over, insert your hook into the same stitch, and pull up a loop. (9 loops on your hook.)
- Yarn over and pull through all 9 loops on your hook.
- Ch1 to secure.
4dc Cluster St – 4dc Cluster Stitch
- Yarn over, insert hook into the indicated space, pull up a loop. Yarn over, pull through 2 loops on hook (2 loops on hook)
- Yarn over, insert hook into the same space, pull up a loop. Yarn over, pull through 2 loops on hook (3 loops on hook)
- Yarn over, insert hook into the same space, pull up a loop. Yarn over, pull through 2 loops on hook (4 loops on hook)
- Yarn over, insert hook into the same space, pull up a loop. Yarn over, pull through 2 loops on hook (5 loops on hook)
- Yarn over, pull yarn through all loops on the hook.
- Ch2 to secure.
5dc Cluster St – 5dc Cluster Stitch
- Yarn over, insert hook into the indicated space, pull up a loop. Yarn over, pull through 2 loops on hook (2 loops on hook)
- Yarn over, insert hook into the same space, pull up a loop. Yarn over, pull through 2 loops on hook (3 loops on hook)
- Yarn over, insert hook into the same space, pull up a loop. Yarn over, pull through 2 loops on hook (4 loops on hook)
- Yarn over, insert hook into the same space, pull up a loop. Yarn over, pull through 2 loops on hook (5 loops on hook)
- Yarn over, insert hook into the same space, pull up a loop. Yarn over, pull through 2 loops on hook (6 loops on hook)
- Yarn over, pull yarn through all loops on the hook.
- Ch3 to secure.
Written In:
This pattern is written using American standard crochet terminology.
Notes:
- This crochet pattern is worked in the round.
- Repeat what is in between the stars from * to * until the end of the round.
- If you have a ** in your row you need to follow the pattern from * to * all the way around and then when you get near the end of the round you will finish your last repeat at ** because you can no longer complete the entire repeat, then follow what it says to do to complete the round.
- Read each row carefully before starting the round.
Let’s get to the pattern!
R1. Make a magic ring, (Alternatively, you can ch 5, join with a slip stitch to make a ring) Ch3 (counts as 1dc) Work 15dc into the ring. Join with a slip stitch to beginning ch3, fasten off (16dc)
R2. Join new yarn in any dc, Ch2, Work a puff stitch in the same stitch and in each dc around, join with a slip stitch to the first puff stitch, slip stitch in to next ch1 space, fasten off (16 puff sts + ch1 spaces)
R3. Join new yarn in any ch1 space, Ch1, Work a 4dc cluster stitch in the same stitch and in each ch1 space around, join with a slip stitch to beginning cluster stitch, slip stitch in to next ch2 space, fasten off (16 cluster sts + 16 ch2 spaces)
R4. Join new yarn in any ch2 space, Ch1, Work a 5dc cluster stitch in the same stitch and in each ch2 space around, join with a slip stitch to beginning cluster stitch, slip stitch in to next ch3 space, fasten off (16 cluster sts + 16 ch3 spaces)
R5. Join new yarn in any ch3 space.
- First Corner: Ch3 (counts as 1tr) Work (2tr, ch2, 3tr) in the same ch2 space.
- Crochet the first side: 3dc in the next ch2 space, 3hdc in the next ch2 space, 3dc in the next ch2 space.
- Second Corner: Work (3tr, ch2, 3tr) in the next ch2 space.
- Crochet the second side: 3dc in the next ch2 space, 3hdc in the next ch2 space, 3dc in the next ch2 space.
- Third corner: Work (3tr, ch2, 3tr) in the next ch2 space.
- Crochet the third side: 3dc in the next ch2 space, 3hdc in the next ch2 space, 3dc in the next ch2 space.
- Final corner: Work (3tr, ch2, 3tr) in the next ch2 space.
- Crochet the last side: 3dc in the next ch2 space, 3hdc in the next ch2 space, 3dc in the next ch2 space, join with a slip stitch to the top of the beginning ch3, slip stitch in to next ch2 space.
Fasten off and weave in all ends. Move on to joining and blocking.
I hope you love your new granny square, have fun crocheting!
Clare x
Joining Granny Squares
Joining granny squares is like piecing together a colorful puzzle, turning individual squares into a cohesive masterpiece. Whether you’re creating a blanket, scarf, or cushion, the process of joining adds a final touch of creativity and satisfaction. With various methods like whip stitch, slip stitch, or join-as-you-go, you can customize the look and feel of your project.
Whip Stitch
To join your granny squares using the whip stitch method, you will need a yarn needle and yarn in the same color as your square.
- Hold two squares together with the right sides facing out and align the stitches.
- Working from right to left, sew whip stitches through each set of loops from both granny squares.
- You can either sew through one loop on each square, or through both loops on each square.
- Repeat across the granny square to join them together.
Joining Granny Squares with the Slip Stitch Method
To join your granny squares using the slip stitch method, you will need a crochet hook and some yarn.
- Start by holding two squares together with the wrong sides facing out and align the stitches.
- Insert your hook through the outer loops of the granny square, the front loops on the square facing you, and the back loop of the square facing away from you.
- Yarn over and pull through both loops on your hook.
- Insert your hook into the next set of loops on your granny square.
- Yarn over and pull through to form the next slip stitch.
- Repeat across the granny square to join them together.
Blocking
Blocking granny squares is a fun and satisfying way to bring out the beauty in your crochet! Here are some easy and effective methods to try:
- Wet Blocking: Soak your square in water, gently shape it, and pin it down on a blocking mat until dry. It’s like giving your square a spa day!
- Steam Blocking: Use a steamer or iron to lightly steam the square while it’s pinned, watching the stitches pop into place.
- Spray Blocking: Mist your square with water, pin it to shape, and let it air dry for a fresh, crisp finish.
Each method helps ensure your squares are even, making your final project look amazing!
More Crochet Granny Square Patterns
If you liked this granny square, you might be interested in these related granny square patterns:
WHERE TO NEXT?
Pin this post: Save this to your Pinterest boards so that you can come back to it later.
Leave a comment: Leave a comment below, we love to hear your feedback!
Share on Instagram: When you make this project, share it on social media and tag me @trulycrochet. We love to see what you are currently making!
TERMS OF USE:
These Terms of Use apply to all the patterns and tutorials made by Truly Crochet. All of the patterns and tutorials are for personal use only and belong to Truly Crochet.
- You are not allowed to copy, reproduce, adjust, distribute or sell Truly Crochet patterns and tutorials in whole or in part.
- You are not allowed to distribute and/or sell the translations of Truly Crochet patterns and tutorials in whole or in part.
- You can sell finished items made using Truly Crochet patterns, however, you have to give credit to Truly Crochet for the actual design.
- You are not allowed to use Truly Crochet photos without written permission.
- You are not allowed to copy and paste Truly Crochet patterns or tutorials to social media or anywhere else in whole or in part.
- If you would like to share the patterns, you can give a link to the Truly Crochet website www.trulycrochet.com.

