Learn how to crochet the Pebble Stitch which includes multiples so you can make whatever you like in the size you want it to be. Scroll down for the free stitch pattern BELOW!

About The Pebble Stitch
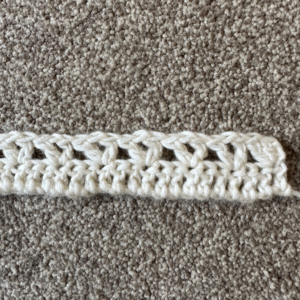
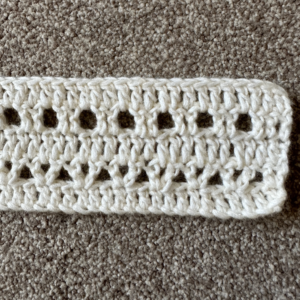
Create the Pebble Stitch with our easy-to-follow tutorial! This beautiful stitch, combining the classic V stitch with delicate eyelet stitches, adds depth and charm to your crochet projects. Whether you’re a beginner or an experienced crocheter, our step-by-step guide simplifies the process, ensuring success with every stitch. This tutorial features written instructions and a photo tutorial. From cozy blankets to elegant garments, the Pebble Stitch offers endless possibilities for your creative endeavors. With clear instructions and helpful tips, you’ll quickly master this captivating stitch and elevate your crochet projects with style and sophistication. Start crocheting today and explore the beauty of the Pebble Stitch! For this crochet stitch pattern I used Yarnsmiths Pebble Haze DK in the color Chrysocolla and 4mm crochet hook.
- You can find my other free crochet stitch tutorials here.
- Save this tutorial to your Pinterest crochet board here.
What to create with this stitch:
- Homewares – dishcloths, blankets, throws, table runners, coasters etc
- Clothing – ponchos, sweaters, summer tops etc
- Accessories – shawls, wraps, bags, gloves etc
Join The Truly Crochet Community:
Or scroll down to view the free crochet stitch pattern right here on the blog supported with ads.
The Pebble Stitch
Stitches Used:
- Ch – Chain
- Dc – Double Crochet
Stitches broken down into easy steps:
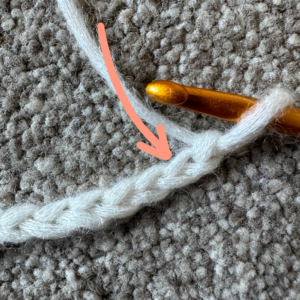
Ch – Chain
- Make a slip knot, insert your hook into the slip knot loop.
- Yarn over and pull up a new loop.
- The first chain stitch is now complete.
- Keep repeating the above steps to make the next chain stitch and the rest of the foundation chain.
Written In:
This pattern is written using American standard crochet terminology.
Notes:
- This crochet pattern is worked in rows starting from the bottom working towards the top, turn your piece over at the end of each row.
- Ch1 at the start of each row does not count as a stitch throughout the pattern.
- Repeat what is in between the stars from * to * until the end of the round.
- If you have a ** in your row you need to follow the pattern from * to * across the entire row and then when you get near the end of the row you will finish your last repeat at ** because you can no longer complete the entire repeat then follow what it says to do to complete the row.
- Read each row carefully before starting the row.
Multiples:
- 3 + 8
Written Instructions for the Pebble stitch:
R1. Chain your desired width using the multiples above, 1dc in 2nd ch from hook and in each ch across, turn
R2. Ch1, 2dc in very first dc, skip next 2dc * Work (1dc, ch1, 1dc) in next dc, skip next 2dc * Repeat from * to * all the way across the row until 1dc remains, 2dc in last dc, turn
R3. Ch1, 1dc in each dc across and 1dc in each ch1 space across, turn
R4. Ch1, 1dc in first 3dc * Ch1, skip next dc, 1dc in next 2dc * Repeat from * to * all the way across the row until 1dc remains, 1dc in last dc, turn
R5. Ch1, 1dc in each dc across and 1dc in each ch1 space across, turn
Repeat rows 2-5 until you reach your desired length finishing on row 3.
Fasten off and weave in ends.
Photo Tutorial for the Pebble stitch:
R1. Chain your desired width using the multiples above, 1dc in 2nd ch from hook and in each ch across, turn
- Place your first dc stitch in the 2nd ch from the hook – the arrow is pointing to it.
- Picture shows your first dc stitch made in 2nd ch from the hook.
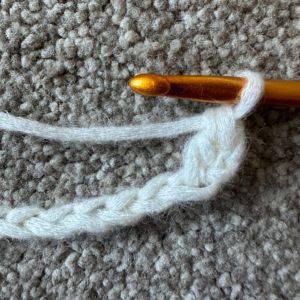
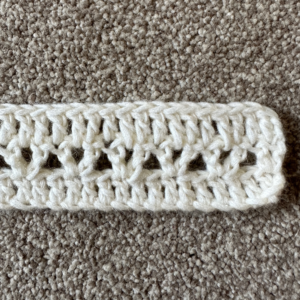
- 1dc in each chain across. This is what row 1 should look like once completed.
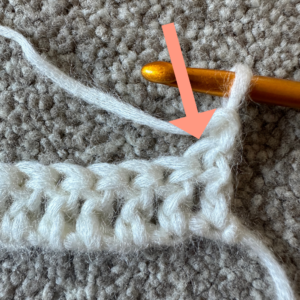
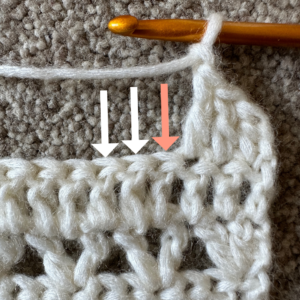
R2. Ch1, 2dc in very first dc, skip next 2dc * Work (1dc, ch1, 1dc) in next dc, skip next 2dc * Repeat from * to * all the way across the row until 1dc remains, 2dc in last dc, turn
- Ch1, place 2dc in the very first dc – the arrow is pointing to it.
- Skip next 2dc – see peach arrows. Work (1dc, ch1, 1dc) in next dc – see white arrow.
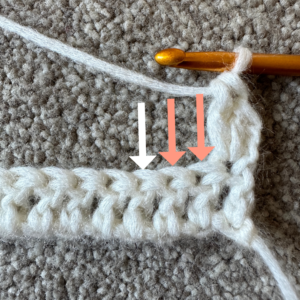
- This is what your row should look like so far. Skip next 2dc – see peach arrows. Work (1dc, ch1, 1dc) in next dc – see white arrow.
- When you get to the end of the row and 1dc remains you will work 2dc in last dc. Picture shows a close up of the end of row 2.
- This is what row 2 will look like once completed.
R3. Ch1, 1dc in each dc across and 1dc in each ch1 space across, turn
- Ch1, 1dc in each dc across and 1dc in each ch1 space across – Peach arrows show you where you will be placing all your dc stitches.
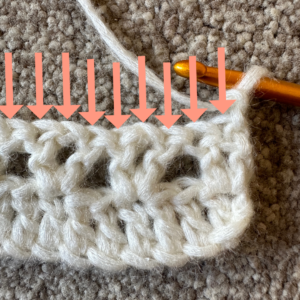
- This is what row 3 will look like once completed.
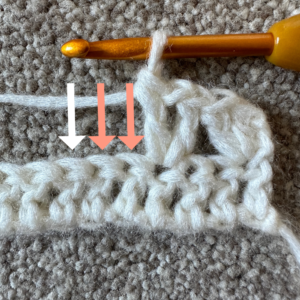
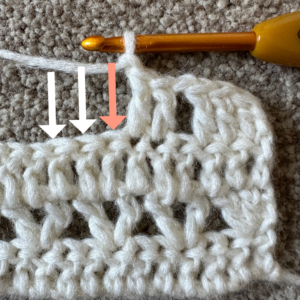
R4. Ch1, 1dc in first 3dc * Ch1, skip next dc, 1dc in next 2dc * Repeat from * to * all the way across the row until 1dc remains, 1dc in last dc, turn
- Once you have made your first 3dc, ch1. Skip next dc – see peach arrow. 1dc in next 2dc – see white arrows.
- This is what row 4 will look like so far. ch1, skip next dc – see peach arrow. 1dc in next 2dc – see white arrows.
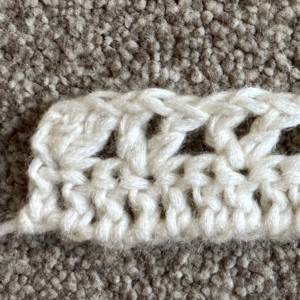
- This is what row 4 should look like once completed.
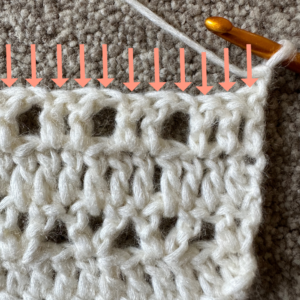
R5. Ch1, 1dc in each dc across and 1dc in each ch1 space across, turn
- Ch1, 1dc in each dc across and 1dc in each ch1 space across – Peach arrows show you where you will be placing all your dc stitches.
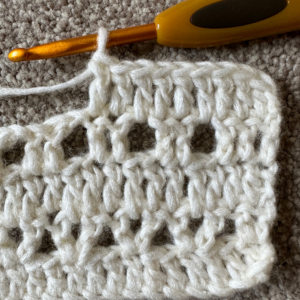
- This is what your row should look like so far.
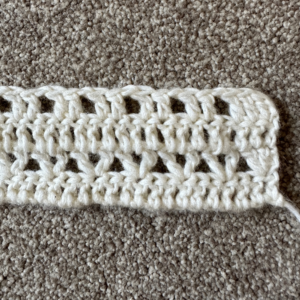
- This is what row 5 will look like once completed.
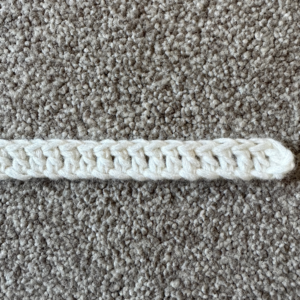
Repeat rows 2-5 until you reach your desired length finishing on row 3.
Fasten off and weave in ends.
Terms Of Use:
These Terms of Use apply to all the patterns and tutorials made by Truly Crochet. All of the patterns and tutorials are for personal use only and belong to Truly Crochet.
- You are not allowed to copy, reproduce, adjust, distribute or sell Truly Crochet patterns and tutorials in whole or in part.
- You are not allowed to distribute and/or sell the translations of Truly Crochet patterns and tutorials in whole or in part.
- You can sell finished items made using Truly Crochet patterns, however, you have to give credit to Truly Crochet for the actual design.
- You are not allowed to use Truly Crochet photos without written permission.
- You are not allowed to copy and paste Truly Crochet patterns or tutorials to social media or anywhere else in whole or in part.
- If you would like to share the patterns, you can give a link to the Truly Crochet website www.trulycrochet.com.
