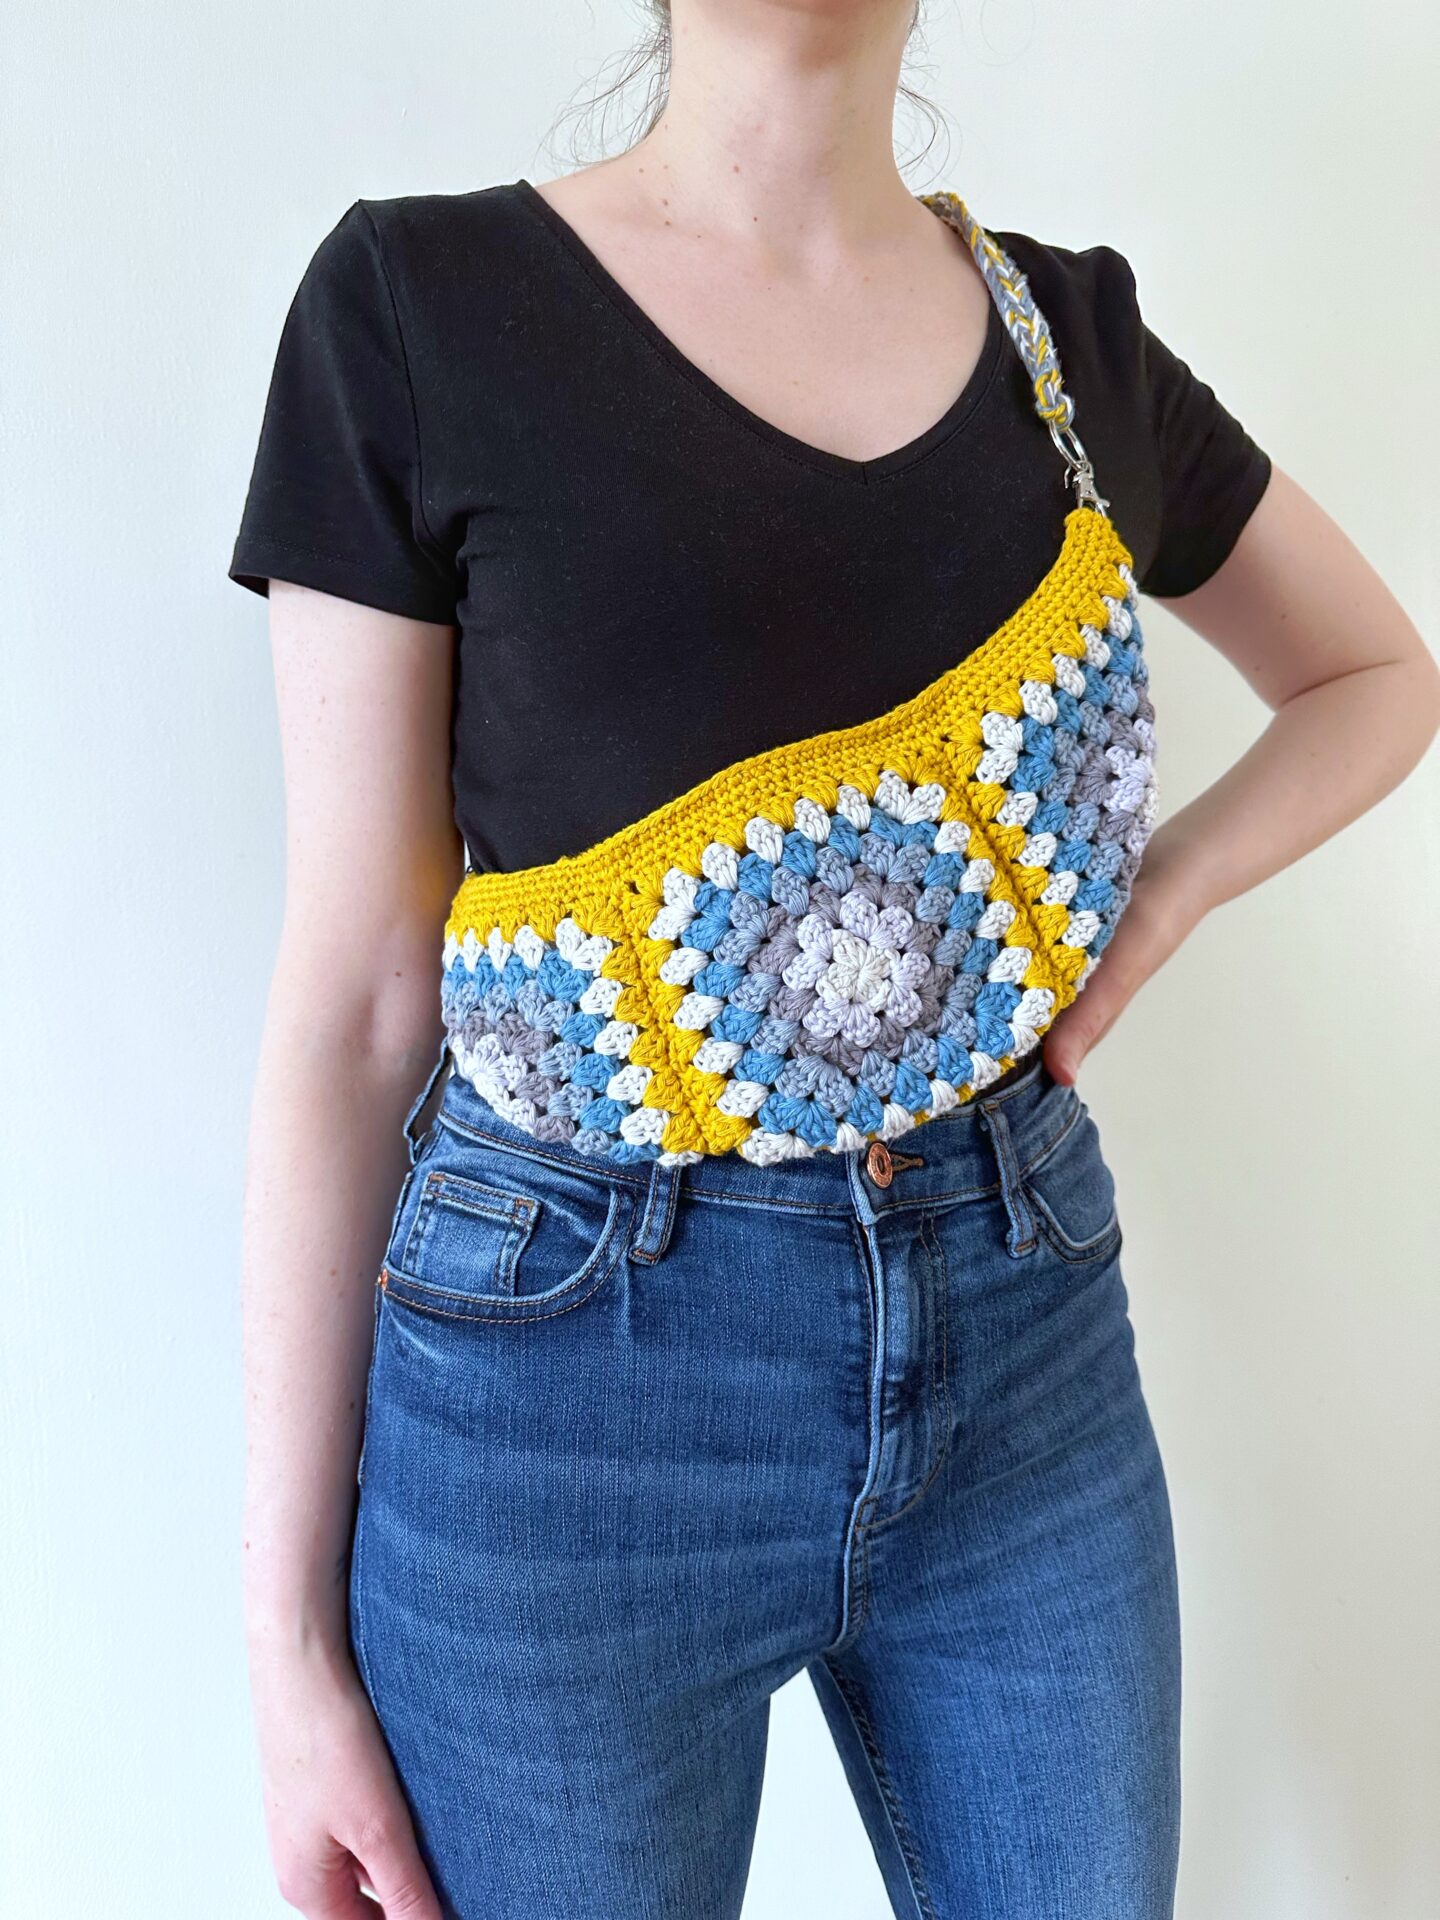
The Granny Square Cross Body Bag is a beginner crochet bag pattern which is super fun to make and works up in no time! Get the free pattern BELOW or purchase the ad free, printable PDF version here which includes lots of pictures.
Design
Today’s free crochet pattern is the Granny Square Cross Body Bag which features four classic granny squares in 6 different colors, this a great beginner friendly crochet bag pattern as it’s so simple to make! You will need a couple of other supplies like a magnetic clasp and two lobster swivel clasps but apart from that you will just need your normal crochet supplies which makes it super simple. This crochet cross body bag is a very popular style at the moment so why not make your own or even better give it as a gift.
Premium AD Free PDF Pattern
Below you will find the full free crochet pattern with ads, but i also like to offer a nicely formatted ad free PDF version of the pattern. This way you can print out the PDF version and pop it in to your bag and have it wherever you are without having to worry about if you can access the pattern online. Lots of pictures are included in this version to help you if you are more visual.
The premium PDF version of this pattern can be purchased HERE!
Other Free Crochet Shawl Patterns

PATTERN:
- Add this pattern to your Ravelry queue HERE
- PIN this pattern to your Pinterest boards HERE
- Join our newsletter for FREE crochet patterns HERE
Materials:
- G/4mm Crochet Hook
- K/6.5mm Crochet Hook
- Rico Creative Cotton Aran
- Scissors
- Yarn Needle – Seaming and weaving in ends
- Tape Measure
- x2 Lobster Swivel Clasps (large for bags)
- Magnetic clasp
- Needle and thread
Colorway
Do each square in the color order below:
- Silver Grey – 92 yards
- Lilac – 92 yards
- Mouse Grey – 92 yards
- Denim – 92 yards
- Blue – 92 yards
- Silver Grey – 92 yards
- Mustard – 150 yards
Size
- Width (from point to point) – 14 inches (approx)
- Length – 5.5 inches (approx)
Gauge
- 7 rounds = 5.75 inch square (approx)
Abbreviations:
Ch Chain
Sc Single Crochet
Dc Double Crochet
St(s) Stitch(es)
Beg Beginning
Written In:
This pattern is written using American standard crochet terminology.
Notes:
- Ch1 at the start of the rows does not count as a stitch throughout the pattern
- After each round turn the square over as this stops the square from slanting.
- Read each row carefully before starting the row
Granny Square Cross Body Bag Pattern
Let’s get to the pattern!
Remember that you can choose the neat ad free, printable PDF version HERE with plenty of pictures to help you along!
Make 4 granny squares:
R1. With 4mm crochet hook – Make a magic circle (alternatively ch4, join with a slip stitch to beg chain to form a ring) ch1 (does not count as a stitch) * work 3dc in ring, ch2 * Repeat 3 more times, join with a slip stitch to beg dc, slip stitch into next ch2 space, fasten off, turn
R2. Join yarn in any ch2 space, ch1 (does not count as a stitch) 3dc in same space, ch2, 3dc in same space (corner made) work (3dc, ch2, 3dc) in each ch2 space around (corners made) join with a slip stitch to beg dc, slip stitch into next ch2 space, fasten off, turn (x4 (3dc, ch2, 3dc)
R3. Join yarn in any ch2 space, ch1 (does not count as a stitch) 3dc in same space, ch2, 3dc in same space (corner made) 3dc in next space between the corners * Work (3dc, ch2, 3dc) in next ch2 space, 3dc in next space between the corners * Repeat around, join with a slip stitch to beg dc, slip stitch into next ch2 space, fasten off, turn (x4 (3dc, ch2, 3dc) + x4 (3dc)
R4. Join yarn in any ch2 space, ch1 (does not count as a stitch) 3dc in same space, ch2, 3dc in same space (corner made) 3dc in next 2 spaces between the corners * Work (3dc, ch2, 3dc) in next ch2 space, 3dc in next 2 spaces between the corners * Repeat around, join with a slip stitch to beg dc, slip stitch into next ch2 space, fasten off, turn (x4 (3dc, ch2, 3dc) + x8 (3dc)
R5. Join yarn in any ch2 space, ch1 (does not count as a stitch) 3dc in same space, ch2, 3dc in same space (corner made) 3dc in next 3 spaces between the corners * Work (3dc, ch2, 3dc) in next ch2 space, 3dc in next 3 spaces between the corners * Repeat around, join with a slip stitch to beg dc, slip stitch into next ch2 space, fasten off, turn (x4 (3dc, ch2, 3dc) + x12 (3dc)
R6. Join yarn in any ch2 space, ch1 (does not count as a stitch) 3dc in same space, ch2, 3dc in same space (corner made) 3dc in next 4 spaces between the corners * Work (3dc, ch2, 3dc) in next ch2 space, 3dc in next 4 spaces between the corners * Repeat around, join with a slip stitch to beg dc, slip stitch into next ch2 space, fasten off, turn (x4 (3dc, ch2, 3dc) + x16 (3dc)
R7. Join yarn in any ch2 space, ch1 (does not count as a stitch) 3dc in same space, ch2, 3dc in same space (corner made) 3dc in next 5 spaces between the corners * Work (3dc, ch2, 3dc) in next ch2 space, 3dc in next 5 spaces between the corners * Repeat around, join with a slip stitch to beg dc, slip stitch into next ch2 space, fasten off, turn (x4 (3dc, ch2, 3dc) + x20 (3dc) Fasten off and weave in all ends – Move on to seaming.
Seam Squares Together:
- Seam 3 squares together side by side using mustard yarn and a yarn needle – I just used the mattress stitch, you can use whatever seaming method that you prefer – Fasten off and weave in ends.
- Lay them flat in front of you horizontally with correct side facing you.
- With the first square, fold the bottom left hand corner of the square diagonal in half to meet the top right hand corner of the same square.
- With the third square, fold the bottom right hand corner of the square diagonal in half to meet the top left hand corner of the same square.
- Place the fourth square (wrong side facing you) on top of the second square – It will look a bit like a boat
- Using a long piece of mustard yarn and a yarn needle, seam the squares together starting at the top of the first square where you placed the corners to meet, you are seaming the first and the fourth square together then along the bottom of the second and the fourth square then up the carrying on round seaming the third and fourth square. Fasten off and weave in ends.
- Your bag should now be completely joined with just the top completely open.
Opening Of Bag:
- With the bag correct side facing outwards, using mustard yarn and 4mm crochet hook, join yarn in one of the ch2 spaces around the top of the bag and sc evenly around the entire bag for 3 rounds, join with a slip stitch to beg sc – Fasten off and weave in ends.
- Alternative Option – At this point you can line the bag and attach a zipper if you would prefer.
- Lay bag completely flat. Using a long piece of mustard yarn and a yarn needle attach yarn at one of the top corners at the opening of the bag, holding bag closed start seaming the pieces together from the corner inwards for about 3.75 inches approx – Fasten off and repeat from the other top corner. You should have an opening left in the middle of the bag.
- Using a needle and thread, attach a magnetic clasp inside the bag opening.
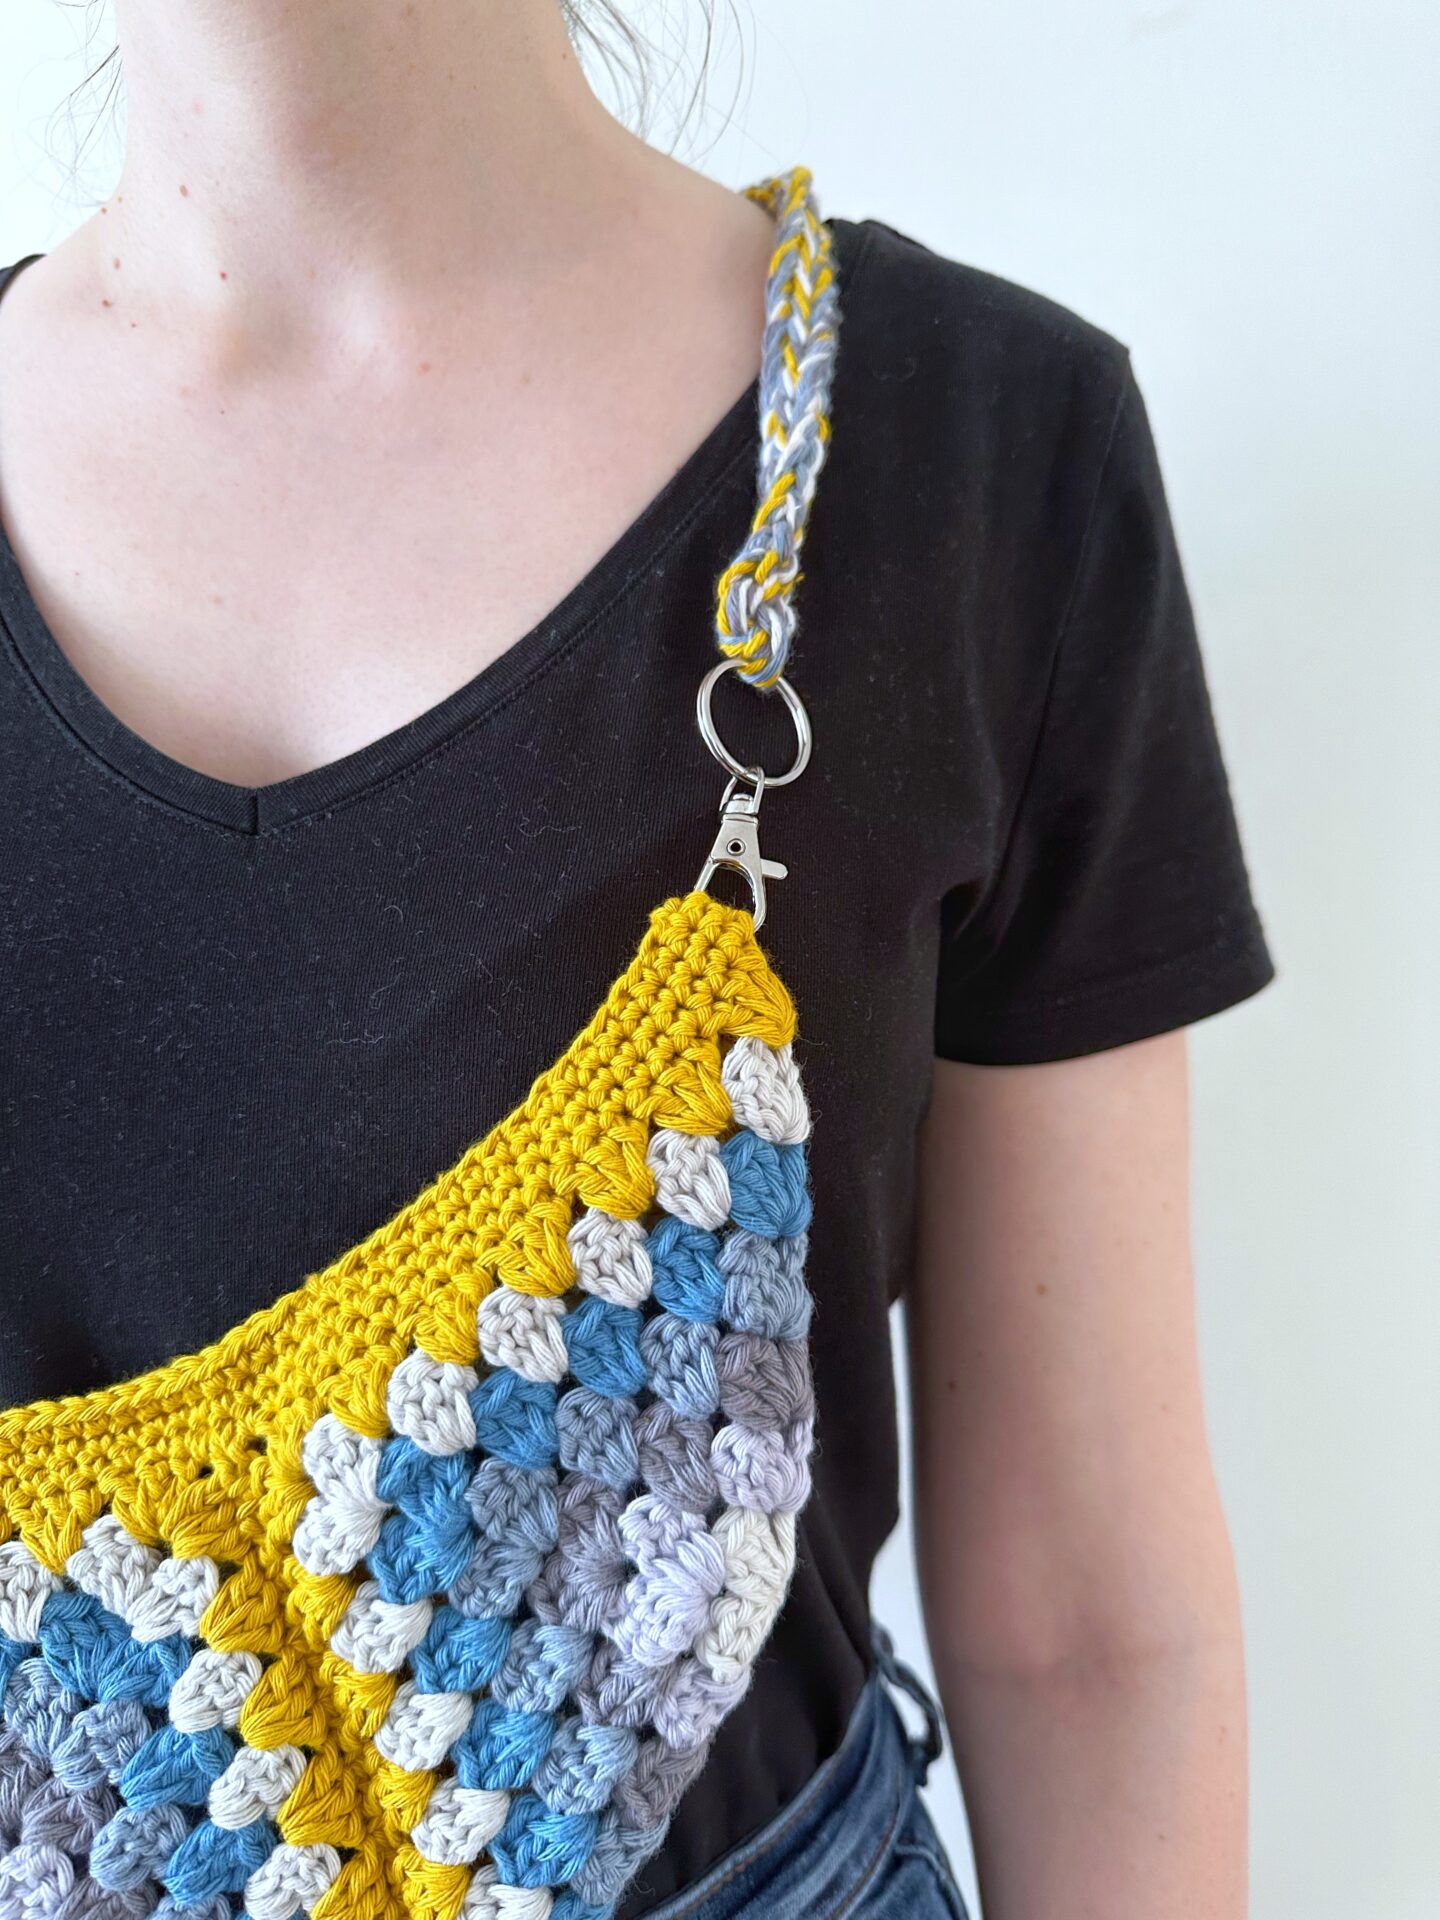
Strap:
- Using 4 strands of yarn and 6.5mm crochet hook, slip stitch into the big jump ring on the lobster clasp, ch72 or until chain measures 23.5 inches approx (or to your desired length) then slip stitch into the second large jump ring on the other lobster clasp.
- Make a sc on the second lobster clasp to make sure it is completely secure then slip stitch in to each chain stitch across back to the first lobster clasp and sc into the first one to make sure – Fasten off and weave in ends.
- Alternatively – You could add a leather strap to the bag if you prefer.
- Attach to bag (see main picture)
OTHER FREE CROCHET SHAWL PATTERNS
- Honest Asymmetrical Shawl
- My Love Sideways Shawl
- Hot Springs Sideways Shawl
- Clearwater Sideways Shawl
Terms of use:
For personal use only. Do not copy, share or sell the pattern in part or whole.
You may sell the finished item made using this pattern.

